Contact Us
ThreadsBundlesNeedles & ThreadersTextilesCraft ToolsNewFree Tools
0Bag
ThreadsBundlesNeedles & ThreadersTextilesCraft ToolsNewFree Tools
FavouritesSign in0Bag
Royal Mail £2.99Free delivery from £25
Free UK delivery on orders of £25 or moreFree delivery from £25Delivery is £2.99 on orders under £25Learn more

How to thread a sashiko needle

For the single-thread method shown here, pass one end through the eye and leave a short tail beside the needle. Keep the other end long for stitching. Making the ends equal would double the thread through most of the work.

Updated 6 September 20262 min read · stitching time variesNeedles and handling
In this article
  1. Prepare and thread
  2. If threading is difficult
  3. Start and finish for your project

Prepare and thread

  1. Cut a clean end

    Use scissors or snips that cut the thread cleanly. Start with a manageable working length; about 50 cm is the Olympus beginner suggestion.

  2. Pass the end through the eye

    Hold the needle by its shaft with the point away from your other hand. Guide the clean end through a compatible eye, or use a suitable threader.

  3. Leave a short tail

    Pull just enough through that the short tail stays in the eye while you handle the needle. Keep a much longer working end. Do not join the two ends for this method.
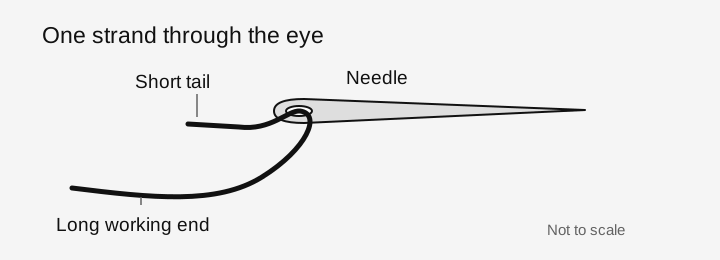
A needle eye with one long working end of thread and one much shorter tail.
One strand passes through the eye. The different end lengths are deliberate; this drawing is not to scale.Original Sashiko Crafts explanatory drawing; no physical sample is represented.

Sources: Olympus: running stitches, starts and finishes

If threading is difficult

A threader also brings a fold of thread through the eye, so it is not a remedy for every too-small eye. Stop if the wire or thread resists. Try an appropriate eye rather than pulling the threader harder.

  • Use a wire-loop threader

Start and finish for your project

Single-thread stitching does not prescribe one universal knot rule. Follow the start and finish used by your pattern; the linked guide explains an overlapping start and reverse-side finish. Put the needle into a secure holder whenever you pause.

  • Start, finish and join sashiko thread

Related tools and materials

  • DARUMA long needles and threader, three needles
  • COSMO hidamari six needles and threader
  • Choose from all sashiko thread

Read next

  1. Choose and fit a leather sashiko thimble2 minute read
  2. Choosing a needle for multiple cloth layers2 minute read
  3. Choosing a sashiko needle for denim2 minute read
Browse all articles

How this guide was prepared

This guide separates referenced product facts from a suggested method to try on your own materials. No in-house stitching test, measured performance comparison or maker endorsement is claimed.

Manufacturer references and the current store catalogue, checked 6 September 2026. Published by Sashiko Crafts.

References and further reading

  • Olympus: running stitches, starts and finishes
  • DARUMA: sashiko needle dimensions and thread pairings

Product instructions vary. Follow the directions supplied with your cloth, thread, marker and tools where they differ from this general guidance.

ShopFree toolsAll collectionsSashiko supplies UKBrowse all articles

Delivery & returnsFAQsContact Us

Our StoryWholesale

Beginner sashiko guideVisible mending guide
United Kingdom

© 2026 Sashiko Crafts. All rights reserved.

Terms & ConditionsPrivacy PolicyShipping PolicyReturns PolicyCookie Policy