
How to start sashiko: your first stitched sample
Start with a scrap of stable cotton and one straight row. That small sample lets you learn the movement, check your needle and thread, and see how the cloth behaves before you commit to a whole pattern.
In this article
What you need
- A scrap of stable woven cotton, large enough to hold comfortably
- One sashiko needle and a compatible cotton sashiko thread
- Scissors or thread snips
- A ruler and a fabric marker tested for removal, or a pre-printed practice cloth
Prepare one small practice area
Use plain cloth for a free practice row, or follow one row on a pre-printed sampler. Keep any printed cloth dry until its instructions allow washing: water-removable lines may disappear before you have stitched them.
Check that the needle takes the thread easily and passes through the cloth without having to force it. For a first row, cut a working length of about 50 cm. Keep the remaining thread labelled so you can find the same range and shade again.
Sources: Olympus: thread, cloth and needle basics; Olympus: running stitch, starts, ends and joins; Olympus: making a hanafukin and removing its printed pattern
Make a running stitch
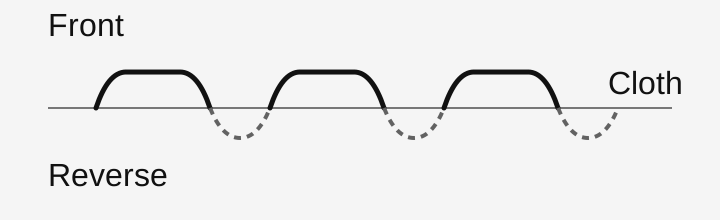
Work along your line, bringing the needle alternately through the front and back. Begin with individual stitches. Once that feels comfortable, gather a few onto the needle before drawing the thread through. Small differences in stitch length are easier to assess after a whole row than after every stitch.
Enter and leave the cloth
Bring the needle up from the reverse, move along the marked line, then take it down. Bring it back up farther along the same line.
Draw the thread through
Pull through until the loose thread has passed. Stop before the row gathers the cloth into a ridge.
Smooth and check
Spread the stitched area gently between your fingers. Set it on the table: the cloth should settle flat without being held under tension.
Add a turn and compare the result
On the next row, practise a gentle curve or a right-angle turn. Take fewer stitches onto the needle as the direction changes. Pause at the turn and look at both sides: a tight span on the reverse can pull two otherwise tidy rows together.
| What you notice | Try next |
|---|---|
| The cloth gathers along the row | Redistribute the thread gently along that row before adding more stitches. |
| Thread repeatedly catches at the eye | Inspect the needle and try a compatible eye size; do not compensate by pulling harder. |
| The marked corner is difficult to follow | Work one stitch at a time around the turn. |
| The row lies flat but the stitches vary | Keep the sample. Use it as a reference for the next practice row. |
Secure the ends before choosing a larger project
Practise the start and finish on this same scrap. The linked guide shows an overlapping start and explains why the end treatment depends on the cloth and project. After finishing, check the reverse for a loose end that can slip free.
Choose your first full project after that check. A supplied sampler pattern removes the marking decision; a small patch gives you a useful repair. Neither requires a large collection of tools.